How to Sew an Athletic Skort

IMG_20180714_094224697

My active little girls love skorts. They are tree climbers, hikers, pig riders, bikers… For the sake of modesty they usually wear bike shorts or leggings under their skirts when they are tearing around, but those can get very hot. I looked at the prices for ready made athletic skorts and thought about how quickly my small heroines could ruin a $30 garment in a tangle with greenbriars or on a slide down a rocky path. I decided there has to be an easy way to make a skort (skirt/shorts combination, for those of you who haven’t heard of this).

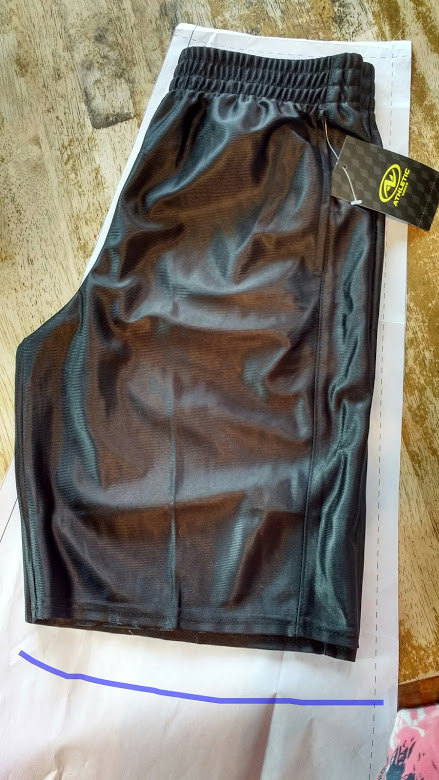
I found knee-length athletic shorts in the boys’ section at Walmart for 4.44. I wanted the mesh fabric ones, but those were wiped out because July. My fabric was just about the same feel as the shorts, stretchy, yet sturdy. It was swimsuit fabric I got on clearance at JoAnn for $3 a yard. I laid the shorts onto a fitted skirt pattern so that I could see how long to cut the skirt part. As you can see, I left about an inch at the top to fold over the shorts elastic and enough at the bottom for a hem.

IMG_20180714_195329

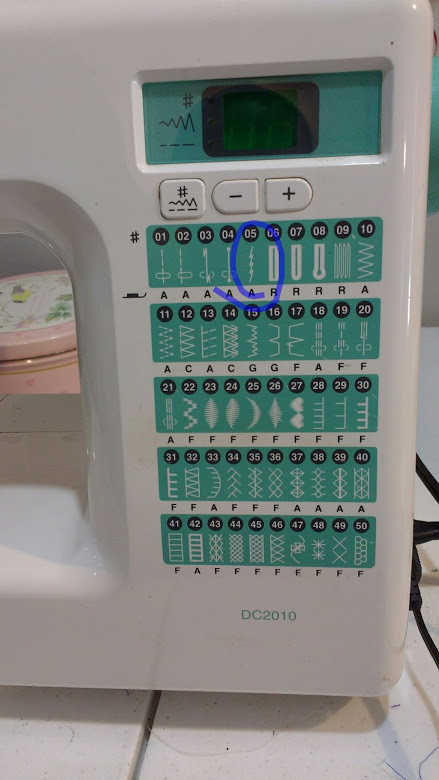
I sewed the sides of the skirt with a lightning stitch to keep the stitches from breaking when the fabric stretches. If you don’t have this stitch option, you can use a small zig-zag. It is also helpful to use polyester thread and definitely a needle for sewing knits.

IMG_20180714_195537IMG_20180714_194845385

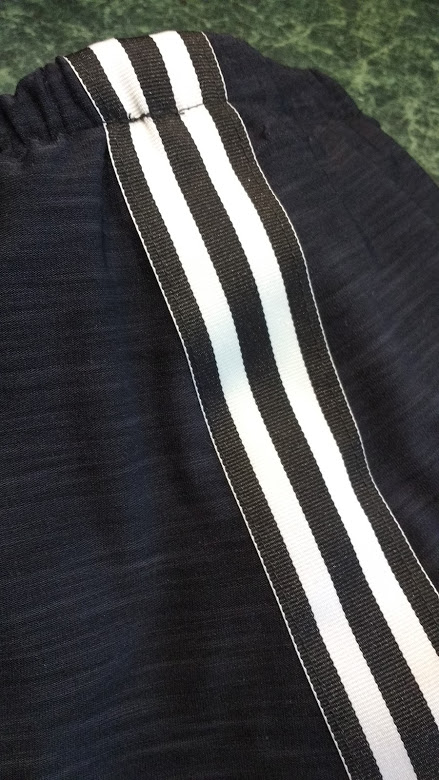
This is a detail of the stripe I sewed on top of the side seams just for fun. Later I realized that it really does reinforce the seam.

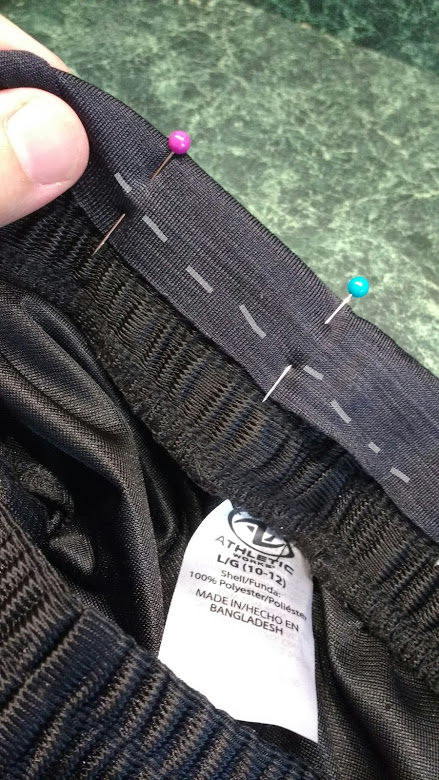
Now let’s backtrack a little to the process of sewing the skirt onto the shorts. I did not use my overlock machine since this fabric didn’t fray at all, but you could neaten it up if you wanted to be picky. This is the skirt top arranged over the top of the shorts. How else could I say that so that it makes more sense? Basically you hold the shorts inside the skirt and double the top of the skirt down over the elastic. Make sure to match the side seams and centers of each piece. I pinned it down to the second seam on the elastic and stitched it about 3/4 inch down. The skirt part was just about the same width as the shorts, but since the elastic was already sewn in once, I had to stretch it gently while pinning the skirt and also while I was sewing.

Don’t use lightning stitch for this! If you have to pick if open for any reason, you will find yourself buying more shorts at Walmart for 4.44 rather than wielding a seam ripper through all those layers. Ordinary straight stitches are much more forgiving in the event that something wonky needs to be altered.

IMG_20180714_195205

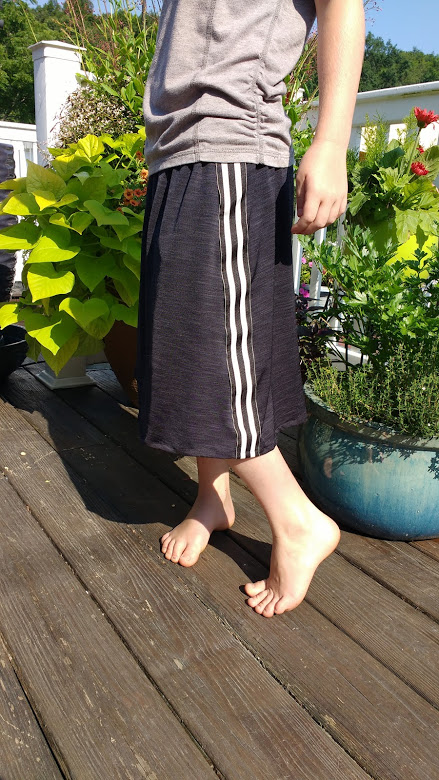
I hemmed the finished garment and behold, it was a skort!  It took about one hour of sewing and $8 worth of fabric, trim, and ready made shorts. The girls asked me if I could figure out how to open the side so they can access the shorts pockets. I said, “Not today, girls.” But I would like to try that on the next pair.

IMG_20180714_200553-1

Who would like to know how many days they can wear these without washing?


How to Beat the Flu: Elderberry Syrup

It’s my repost day, and I would like to make a public service announcement:  The flu is really bad this year. Have you noticed? My husband keeps telling me what an awful strain of flu this year is packing. This is not to be confused with stomach bugs, which are bad enough. It is the aching, please-let-me-just-die-now flu, and sadly, many immuno-compromised people are dying. By the grace of God our family has not experienced anything worse than common colds this entire winter. We have two people who are supposed to be extra susceptible to germs in our house. Aside from trying to stay away from germy situations, I keep waiting for it with my weapon that I stock in my fridge all winter long. I often get asked for this recipe, and I suppose you could always search for it in the archives where I posted it four years ago, but here it is, with love and a few edits.

(edit: My husband is extremely skeptical of potions, home-remedy-cure-alls, etc, but he swigs elderberry syrup as soon as he feels a little bit ill. He works with sick people all the time, and he has not had to take a sick day in five years. We credit the mercy of God above all, these amazing little berries that are a part of His mercies too, and maybe the fact that those in healthcare have mandatory flu shots. You can pick your chin off the floor now. )


Here’s our recipe for Elderberry Syrup

  • 1 Cup fresh elderberries or 1/2 cup dried
  • 1 cinnamon stick
  • 1 Tbsp fresh ginger, grated
  • 5 whole cloves
  • 2 cups water
  • 1/2 cup raw honey
  • Bring first 5 ingredients to boil in a saucepan: simmer until reduced to half, about 20 minutes. Squash berries and strain mixture. Add honey to strained liquid: pour in a glass jar and store in refrigerator. Take 1 tsp or more when cold or flu symptoms start, up to 3 Tbsp a day. This is safe for children, but because of bacteria concerns in the raw honey, it is not recommended for children under 1 year of age.

There it is! My go-to potion when anybody in our house sneezes or sniffles/pukes or flus. I got this recipe from my sister-in-law, Rhonda, who got it from a friend… I don’t know who really gets credit for the original, but it is really good. I tweaked it a bit, and sometimes I stir in 1 TBS of bee pollen. The ginger soothes upset stomach, and we find it too cloying with over-much honey, even though raw honey has many healing properties. It also preserves the syrup for a long time in the fridge. I have seen other recipes where people add lemon juice, and the product you buy from Beeyoutiful contains apple cider vinegar. My children struggle a bit with the sourness of the flavor, so I haven’t added it. Yet. As you can see, the recipe is quite open to interpretation, made as pleasant or unpleasant as you like.

Edit: The cloves are the spice cloves, whole ones. Somebody I love dearly thought it was garlic cloves, which probably would also help the immune system, just not too tastefully in this preparation. She was ready to cook her concoction when it dawned on her that something was not quite right.

The star is elderberry, lovely elderberry.

Elderberries are effective against both bacteria and viruses, and act to prevent viruses from entering cells. Taking elderberry syrup, extract or juice can lessen the duration of flu symptoms. Elderberries contain anthocyanins, potent antioxidants that protect cells from damage. Anthocyanins also boost the immune system by inducing the production of cytokines, small proteins that play a role in regulating immune response.

Image

Photo credits here, along with another informative article on flu-fighting elderberry studies. Listen to what they say, “A study published in the Journal of Alternative and Complementary Medicine…found that elderberry decreased the symptoms of influenza (including fever) within 2 days and achieved a cure of influenza in 2 days in 90% of the group receiving elderberry, compared to 6 days with placebo.  The most interesting thing about this study is that it was looking at Influenza type B – a type of influenza that Tamiflu and Amantadine are not effective in treating.” I would so prefer to feed my family a medicinal berry made by God than a drug with dubious side effects, which might make you feel even worse than you did before you took it.

I want an elderberry bush. Actually, I would like a whole thicket of elderberries, so I could share with all my friends. I bought my freeze dried berries at Sunburst Superfoods. The price for one pound is less than the price for one (smallish) bottle of elderberry syrup, already prepared, which is why I bought them, of course.

*****************************

edit: I now have two elderberry bushes. The dog loves to chew on the stems, for some odd reason, and the birds have a way of robbing all the berries before they are quite ripe. Also, they are very tiny and labor intensive; the stems are toxic; it takes a lot of berries to make a pound of dried ones! It made me feel good to try raising them, but my best sources are still the bulk herb stores.

There is a source for already made syrup, which is what I always bought before I started making my own. I can heartily endorse the products from Beeyoutiful. See link above.

Does this actually work? Yes, it really does. I stay on the ball with dosing someone who is starting with flu like symptoms, and we rarely have any sickness that lasts longer than 2 days. I keep them dosed every couple of hours. Give it a try, and let me know what you think.

Stay well, my friends!

You Can Make it Yourself

IMG_20170325_180948

Turns out a number of you would like to see how I made those paper flowers on the garland in my last post. I was a little surprised at that, considering the underwhelming photo I used to show what I had done. But they do please me every day, so I am glad I “wasted” my Saturday afternoon. Today, however, I got victory over my bathroom cleaning before I sat down to show you how I did the flowers. You start with a book, obviously. Not too brittle in the pages, but oldish looking is best. Even better would be an old songbook. I tore out seven pages at a time, because I am efficient like that.

IMG_20170325_180451

This spiral flower is what I started with last week, but it did not pop enough for my garland. The main problem was that my book pages were too small to make an exciting flower. So I set aside the ones I made and used them for the centers of the bigger, better flowers. I just freehanded this circle because templates are boring and too perfect.

IMG_20170325_180410IMG_20170325_180620

Starting at the end, you simply roll up the spiral between thumb and finger until you get to the center. You will want to have the hot glue ready to go, because those curls spin out on you (They are supposed to. Just not all the way back to the flat spiral.) and it helps to be able to squash them down onto the glue once you have the desired size. I rolled and rerolled my first few flowers until I got the hang of this step.

IMG_20170325_180645IMG_20170325_180526

I drew my petals onto the page in graduated sizes because templates are boring. Wait. I already said that. But really, your finished product looks better if you have some variation, unless you want to get out a level and ruler when you are gluing the petals. See my stack of seven pages? Just cut them all at once; save yourself a lot of hassle. And be sure to cut inside the pen lines so you don’t see them on the flower edges.

IMG_20170325_180703

The petals get a slit about halfway up through. And there sits the pretty little center, waiting. (Have you noticed my kitchen table yet? I keep planning half-heartedly to refinish it, but then I would have to hover when the children do projects, and now it is just so stress free. )

IMG_20170325_180721IMG_20170325_180820

Those two photos show the way you use school glue to overlap the petals slightly where you cut the slit. I do not recommend hot glue at this step because fingertips are important, and hot glue has no respect. If you want your flowers for hanging on a garland or on the wall, do not curve them much at all or they will hang almost upside down. I started with seven petals on the outside row, then six in the others. There are no rules here. Some of our flowers only had four outside petals and a center.

IMG_20170325_180847IMG_20170325_180910

The center does require hot glue to hold that much weight. For a garland, bend a paper clip and glue it to the center of the flower on the back. Use gross-grain (important… because the ribbed weave of gross-grain holds the flowers where you put them) ribbon to hang them by hooking the paper clip over it.

IMG_20170325_181024IMG_20170325_181049

These are other petal shapes we tried. I think the oval is my favorite, but it does make the garland more pleasing to have some variety. Below is another way to finish out the flower in the middle. You roll up the frill, and glue it to the middle, then spread out the frill like stamens. The more we worked at it, the more ideas we got. I did a brief foray on pinterest, then decided to wing it. Olivia, however, saw a tutorial for making hyacinths. She took off on that on her own. You can see her contributions in the last photo.

IMG_20170325_180549IMG_20170325_181124

And that, my friends, is what happens when you use pretty colors and cup the petals so that they sit on a ledge like a… water lily?

Those are our happy chickens, freeranging like anything around the blueberry bushes. You can’t see them, but the children are down on the dock, fishing. Unsuccessfully, I might add. And that is also my garden, just waiting to dry out.

Soon there will be rows of real flowers and butterflies flitting.

(If you try this, let me know. Or I will never do another tutorial. Well, maybe I will. )

Send the Flu Packing: Homemade Elderberry Syrup

It’s my repost day, and I would like to make a public service announcement:  The flu is really bad this year. Have you noticed? My husband keeps telling me what an awful strain of flu this year is packing. This is not to be confused with stomach bugs, which are bad enough. It is the aching, please-let-me-just-die-now flu, and a lot of people are dying. By the grace of God we have not experienced anything worse than common colds this entire winter. I have a weapon that I keep in my fridge all winter long. I think this may be the blog post I am asked about more than any other. You could always search for it in the archives where I posted it four years ago, but here it is, with love and a few edits.

(My husband is extremely skeptical of potions, home-remedy-cure-alls, etc, but he swigs elderberry syrup as soon as he feels a little bit ill. He works with sick people all the time, and he has not had to take a sick day in five years. We credit the mercy of God above all, and these amazing little berries are a part of His mercies too!)


  • 1 Cup fresh elderberries or 1/2 cup dried
  • 1 cinnamon stick
  • 1 Tbsp fresh ginger, grated
  • 5 whole cloves
  • 2 cups water
  • 1 cup raw honey
  • Bring first 5 ingredients to boil in a saucepan: simmer until reduced to half, about 20 minutes. Squash berries and strain mixture. Add honey to strained liquid: pour in a glass jar and store in refrigerator. Take 1 tsp or more when cold or flu symptoms start, up to 3 Tbsp a day. This is safe for children, but because of bacteria concerns in the raw honey, it is not recommended for children under 1 year of age.

There it is! My go-to potion when anybody in our house sneezes or sniffles/pukes or flus. I got this recipe from my sister-in-law, Rhonda, who got it from a friend… I don’t know who really gets credit for the original, but it is really good. I tweak it a bit, double the fresh ginger, halve the honey, and after it is strained, I stir in 1 TBS of bee pollen. The ginger soothes upset stomach, and we find it too cloying with so much honey, even though raw honey has many healing properties. I have seen other recipes where people add lemon juice, and the product you buy from Beeyoutiful contains apple cider vinegar. My children struggle a bit with the sourness of the flavor, so I haven’t added it. Yet. As you can see, the recipe is quite open to interpretation, made as pleasant or unpleasant as you like.

Edit: The cloves are the spice cloves, whole ones. Somebody I love dearly thought it was garlic cloves, which probably would also help the immune system, just not too tastefully in this preparation. She was ready to cook her concoction when it dawned on her that something was not quite right.

The star is elderberry, lovely elderberry.

Elderberries are effective against both bacteria and viruses, and act to prevent viruses from entering cells. Taking elderberry syrup, extract or juice can lessen the duration of flu symptoms. Elderberries contain anthocyanins, potent antioxidants that protect cells from damage. Anthocyanins also boost the immune system by inducing the production of cytokines, small proteins that play a role in regulating immune response.

Image

Photo credits here, along with another informative article on flu-fighting elderberry studies. Listen to what they say, “A study published in the Journal of Alternative and Complementary Medicine…found that elderberry decreased the symptoms of influenza (including fever) within 2 days and achieved a cure of influenza in 2 days in 90% of the group receiving elderberry, compared to 6 days with placebo.  The most interesting thing about this study is that it was looking at Influenza type B – a type of influenza that Tamiflu and Amantadine are not effective in treating.” I would so prefer to feed my family a medicinal berry made by God than a drug with dubious side effects, which might make you feel even worse than you did before you took it.

I want an elderberry bush. Actually, I would like a whole thicket of elderberries, so I could share with all my friends. I bought my freeze dried berries at Sunburst Superfoods. The price for one pound is less than the price for one (smallish) bottle of elderberry syrup, already prepared, which is why I bought them, of course. (edit: I have two elderberry bushes. The dog loves to chew on the stems, for some odd reason, and the birds have a way of robbing all the berries before I get to them. It made me feel good to try raising them, but my best sources are still the bulk herb stores.)

Does this actually work? Yes, it really does. I stay on the ball with dosing someone who is starting with flu like symptoms, and we rarely have any sickness that lasts longer than 2 days. I keep them dosed every couple of hours. This is really important to me, because I have a child with a compromised immune system. Flu is our biggest enemy, the doctors say. She has not yet ever needed to go to the emergency room for rehydration, thank God! Give it a try, and let me know what you think.

Stay well, my friends!